Every homeowner dreams of refreshed, clean painted surfaces, but one wrong move with a pressure washer can strip paint, cause water intrusion, and turn a simple cleaning project into a costly repair nightmare. The good news? Pressure washing painted surfaces safely is entirely achievable when you understand the right pressure settings, nozzle choices, and techniques. This guide walks you through professional methods to restore your home’s appearance without damaging the paint you worked so hard to maintain.
Table of Contents
- Introduction To Pressure Washing Painted Surfaces
- Prerequisites And Preparation For Safe Pressure Washing
- Step By Step Pressure Washing Process For Painted Surfaces
- Soft Washing As A Safe Alternative For Delicate Painted Surfaces
- Common Mistakes And Troubleshooting Tips For Pressure Washing Painted Surfaces
- Expected Results And Long Term Benefits Of Regular Pressure Washing
- Discover Expert Pressure Washing Services In South East PA
- Frequently Asked Questions About Pressure Washing Painted Surfaces
Key Takeaways
| Point | Details |
|---|---|
| Pressure Limit | Use maximum 1500 PSI to avoid stripping paint and causing water intrusion. |
| Nozzle Selection | A 25 degree nozzle disperses pressure evenly, protecting painted surfaces from gouging. |
| Safety Gear | Always wear gloves, eye protection, and PPE to prevent injuries during operation. |
| Testing First | Test a small hidden area before full washing to catch paint vulnerabilities early. |
| Soft Washing Option | For delicate surfaces, soft washing uses low pressure and cleaning solutions as a safer alternative. |
Introduction to Pressure Washing Painted Surfaces
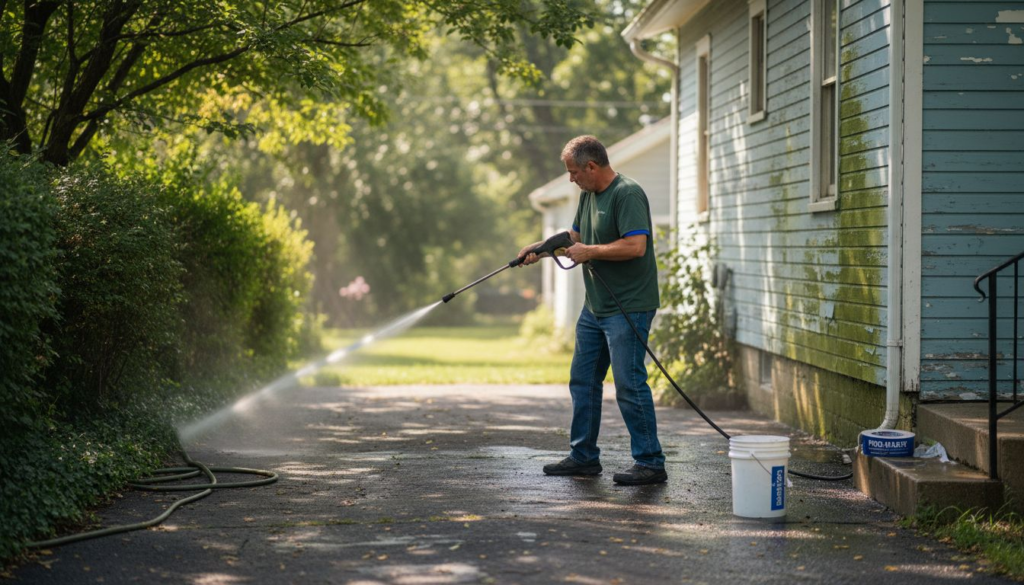
Pressure washing painted surfaces involves using controlled water pressure to remove accumulated dirt, mold, mildew, and environmental grime that dulls your home’s exterior. When done correctly, this process restores the original vibrancy of your paint and can add years to its lifespan. The challenge lies in balancing cleaning power with paint protection.
Using pressure above 1500 PSI on painted surfaces creates serious risks. Excessive force can strip paint layers, allow water to penetrate behind siding, and create conditions for rot and mold growth inside your walls. A 25 degree nozzle becomes your best friend here because it disperses water across a wider area, reducing concentrated impact on any single point. Incorrect pressure or nozzle selection remains one of the leading causes of paint damage during DIY cleaning projects.
Many homeowners believe pressure washing always damages paint, but this misconception stems from improper technique rather than the method itself. Professional approaches like our pressure washing techniques demonstrate how carefully calibrated equipment and systematic application protect surfaces while delivering thorough cleaning. The key differentiators include:
- Starting at the lowest pressure setting and gradually increasing only if needed
- Maintaining consistent distance between nozzle and surface throughout the process
- Using sweeping motions rather than concentrated blasts on a single spot
- Understanding when to switch from pressure washing to gentler soft washing methods
- Recognizing paint conditions that require professional assessment before proceeding
When you understand these fundamentals, pressure washing becomes a valuable maintenance tool rather than a risky gamble with your home’s exterior.
Prerequisites and Preparation for Safe Pressure Washing
Before you pull the trigger on your pressure washer, gathering the right equipment and taking safety precautions makes the difference between successful cleaning and expensive repairs. You need an adjustable pressure washer capable of operating at or below 1500 PSI. Many residential models offer 2000 to 3000 PSI maximum, which means you must be able to dial down the pressure accurately.
Your nozzle selection determines whether you protect or damage painted surfaces. The 25 degree nozzle, typically color coded green, provides the ideal spray pattern for painted exteriors. It creates a wide enough fan to clean effectively without concentrating force dangerously. Keep a 40 degree nozzle (white) on hand as a gentler backup for particularly delicate areas.
Wearing personal protective equipment protects you from flying debris, chemical exposure, and water ricochet during operation. Essential safety gear includes:
- Impact resistant eye protection or full face shield
- Waterproof gloves with good grip texture
- Non slip, closed toe boots or shoes
- Long pants and sleeves to protect skin from spray
- Hearing protection if using gas powered equipment
Pro Tip: Apply painter’s tape over outdoor electrical outlets, light fixtures, and vents before washing. This simple step prevents water intrusion into areas that shouldn’t get wet.
Testing a small, hidden area before tackling your entire house cannot be overstated. Choose a spot behind bushes or on a less visible wall section. Wash a two foot square area using your planned pressure and nozzle, then wait 24 hours. Check for paint lifting, color fading, or surface damage. This test reveals how your specific paint formulation responds to pressure washing.
If you plan to use cleaning solutions, prepare eco-friendly options that won’t harm landscaping. Mix a solution of one part white vinegar to three parts water for light mold, or use biodegradable pressure washing detergents specifically formulated for painted surfaces. Review pressure washing preparation steps for additional equipment considerations and safety protocols that professionals follow.
| Equipment Type | Specification | Purpose |
|---|---|---|
| Pressure Washer | Adjustable, max 1500 PSI | Provides safe cleaning power |
| Nozzle | 25 degree (green) | Disperses pressure protecting paint |
| Cleaning Solution | Eco-friendly, pH neutral | Enhances cleaning without damage |
| Safety Gear | Gloves, eye protection | Prevents injuries during use |
Step by Step Pressure Washing Process for Painted Surfaces
With your equipment assembled and safety gear on, you’re ready to begin the systematic washing process that protects paint while delivering thorough cleaning results. Following these steps in order ensures consistent, damage free outcomes.
-
Start with lowest pressure setting. Begin at 500 to 800 PSI and test on an inconspicuous area. Gradually increase pressure in 200 PSI increments only if cleaning proves insufficient, never exceeding 1500 PSI maximum.
-
Position yourself correctly. Stand at a comfortable distance allowing you to maintain control. Hold the nozzle approximately 12 inches from the painted surface, adjusting slightly based on cleaning effectiveness and paint response.
-
Use sweeping horizontal motions. Move the spray wand in consistent, overlapping passes from left to right or right to left. Think of painting with a wide brush rather than spot cleaning. This technique prevents streaking and uneven cleaning patterns.
-
Work from top to bottom. Begin at the highest point of your home and work downward. This approach allows dirty water and loosened debris to flow down over areas you haven’t cleaned yet, preventing you from re-soiling freshly washed sections.
-
Never hold spray stationary. Keeping water pressure concentrated on one spot for more than a split second can strip paint, gouge wood, or force water behind siding. Keep the wand moving at all times during operation.
-
Rinse thoroughly after washing. If you used cleaning solutions, rinse the entire surface with plain water at reduced pressure. This removes chemical residue that could otherwise attract dirt or affect paint longevity.
-
Allow proper drying time. Let surfaces air dry completely, which typically takes 24 to 48 hours depending on weather conditions. Adequate drying prevents moisture related problems like mold growth or paint bubbling.
Pro Tip: Work in sections no larger than 10 by 10 feet. Complete each section fully, including rinsing, before moving to the next area. This systematic approach prevents solutions from drying on surfaces before you can rinse them.
Understand that a typical pressure washing session takes 2 to 4 hours for an average sized home, with visible cleaning results appearing immediately after washing. Rushing through the process increases error risk, so budget adequate time. For detailed guidance on execution, review step by step pressure washing instructions that professionals use daily.
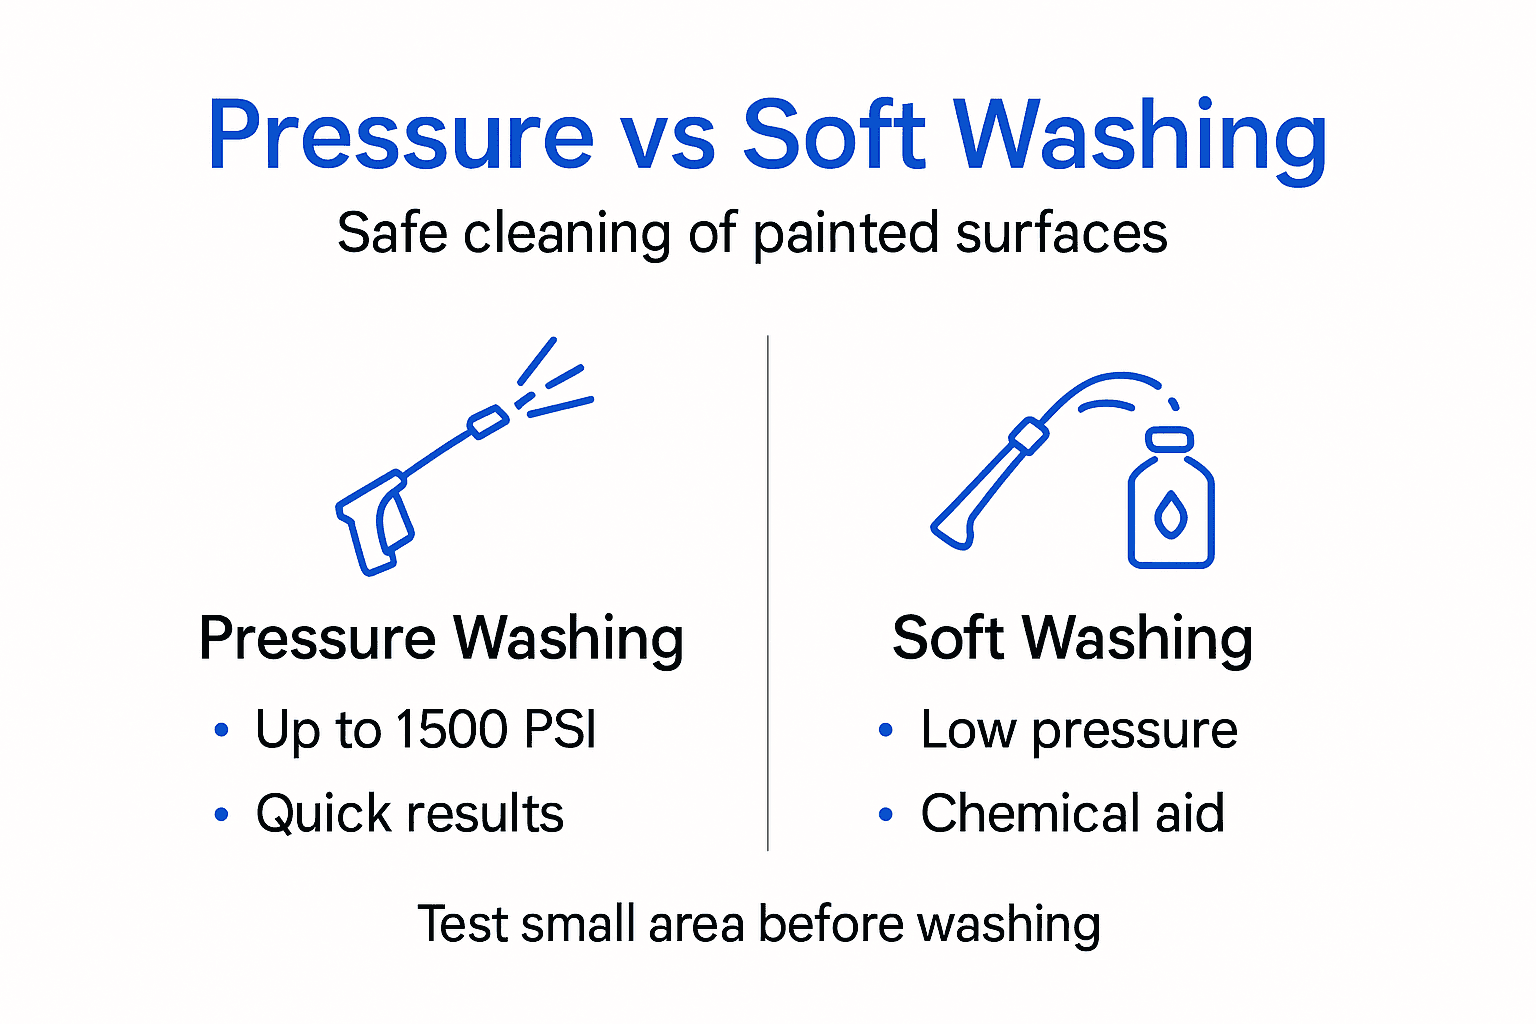
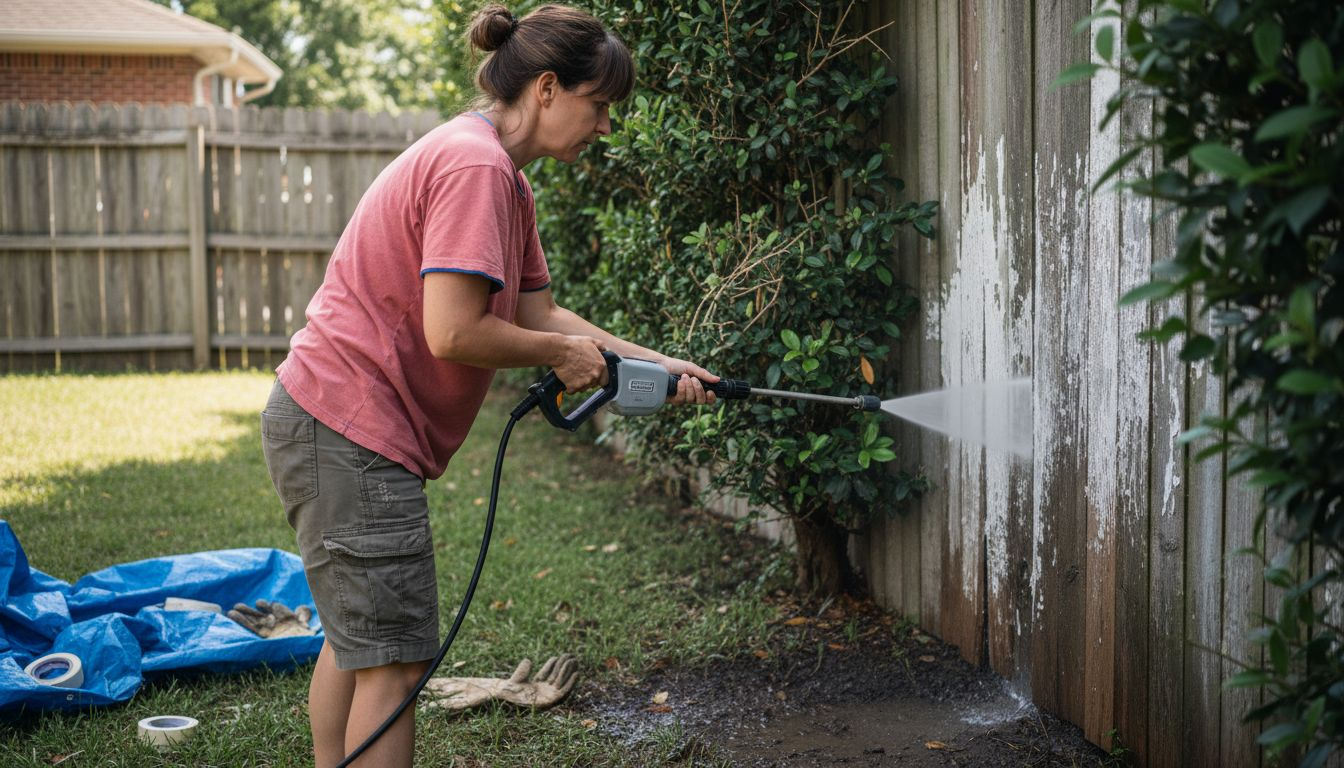
Soft Washing as a Safe Alternative for Delicate Painted Surfaces
When painted surfaces show signs of age, feature delicate finishes, or display extensive mold growth, soft washing provides a gentler yet equally effective alternative to traditional pressure washing. Soft washing uses low pressure water combined with specialized cleaning solutions to safely clean without mechanical force that risks paint damage.
The fundamental difference lies in approach. Pressure washing relies on water force to remove contaminants, while soft washing depends on chemical action to break down dirt, mold, and mildew. Water pressure in soft washing typically ranges from 100 to 500 PSI, roughly equivalent to a garden hose with a spray nozzle. The cleaning solutions do the heavy lifting.
Soft washing shines in specific scenarios:
- Older homes with original paint showing signs of brittleness or flaking
- Wood siding with intricate details or delicate trim work
- Surfaces with heavy mold or mildew requiring deeper biological cleaning
- Recently painted exteriors where you want to avoid any pressure risk
- Historic homes where paint preservation takes priority over aggressive cleaning
Equipment requirements differ from pressure washing. You need a dedicated soft wash system featuring a chemical pump, specialized nozzles designed for low pressure application, and proper mixing tanks for cleaning solutions. Many soft wash solutions use sodium hypochlorite (bleach) combined with surfactants, though eco-friendly alternatives exist for environmentally conscious homeowners.
The process takes longer than pressure washing because chemical dwell time matters. After applying the cleaning solution, you typically wait 10 to 20 minutes for it to work before rinsing with low pressure water. Results match or exceed pressure washing outcomes while virtually eliminating paint damage risk.
| Factor | Pressure Washing | Soft Washing |
|---|---|---|
| Pressure Level | Up to 1500 PSI | 100 to 500 PSI |
| Cleaning Method | Mechanical force | Chemical action |
| Best For | Durable painted surfaces | Delicate or aged paint |
| Time Required | 2 to 4 hours | 3 to 5 hours |
| Damage Risk | Moderate if done wrong | Very low |
Choosing between pressure washing and soft washing depends on your specific surface conditions, paint age, and contamination type. When in doubt, soft washing offers the safer route for painted exteriors.
Common Mistakes and Troubleshooting Tips for Pressure Washing Painted Surfaces
Even experienced DIYers make errors that compromise results or damage paint during pressure washing projects. Recognizing these common pressure washing mistakes helps you avoid costly repairs and achieve professional quality outcomes.
Exceeding 1500 PSI on painted surfaces represents the most frequent and damaging error. Higher pressure feels more powerful and can seem more effective initially, but it strips paint, forces water behind siding, and creates long term moisture problems inside walls. Always start low and increase incrementally, stopping well before maximum safe pressure.
Wrong nozzle selection causes concentrated damage even at correct pressure. A zero degree (red) or 15 degree (yellow) nozzle concentrates water force into a small area, acting like a cutting tool rather than a cleaning implement. These nozzles have legitimate uses on concrete or metal, but never belong on painted wood or siding. Stick with 25 degree or wider nozzles exclusively.
Skipping personal protective equipment puts you at unnecessary risk. Water rebounds from surfaces at high velocity, carrying loosened paint chips, dirt, and potentially harmful cleaning chemicals. Eye injuries from pressure washing send people to emergency rooms every year, yet proper PPE makes the activity remarkably safe.
Failing to test a hidden patch before full scale washing leads to widespread damage that could have been prevented with a simple five minute test. Different paint formulations, ages, and application methods respond differently to pressure. Your neighbor’s successful pressure washing experience doesn’t guarantee your paint will react the same way.
Holding the spray nozzle stationary creates several problems:
- Concentrated water pressure strips paint in that exact spot
- Uneven cleaning leaves visible streaks and patches
- Increased water intrusion risk as pressure penetrates surface longer
- Gouging or etching of underlying substrate materials
Pro Tip: If you notice paint beginning to lift or peel during washing, stop immediately. Reduce pressure by 25 percent, increase your distance from the surface, and slow your sweeping speed. If damage continues, switch to soft washing or consult professionals.
Working against paint grain or natural surface patterns causes premature wear. On wood siding, always wash parallel to board direction. On stucco or textured surfaces, use circular motions that work with texture rather than against it. Review common mistakes to avoid for additional troubleshooting guidance specific to various surface types.
Expected Results and Long Term Benefits of Regular Pressure Washing
Understanding realistic outcomes helps you evaluate success and plan ongoing maintenance for your painted exteriors. Immediately after proper pressure washing, you’ll notice dramatically improved appearance. Colors look brighter, details become more visible, and your home’s curb appeal increases substantially. Dirt and grime that accumulated gradually over years disappears in hours.
Proper pressure washing extends painted surface lifespan by removing contaminants that actively degrade paint. Mold produces enzymes that break down paint binders. Dirt holds moisture against surfaces, accelerating deterioration. Regular cleaning eliminates these threats before they cause permanent damage.
Long term benefits include:
- Paint lifespan extension of three to five years beyond typical duration
- Prevention of costly repairs from mold, rot, or water damage
- Maintained or increased property value through superior exterior condition
- Early detection of paint failure or structural issues requiring attention
- Reduced frequency of complete repainting projects
For residential properties, expect pressure washing sessions to last two to four hours depending on house size, surface condition, and contamination level. Larger homes or those with extensive mold growth require additional time. Most homeowners should pressure wash painted exteriors every one to three years, with frequency depending on local climate, surrounding vegetation, and exposure to environmental contaminants.
You’ll see best results when pressure washing becomes part of regular home maintenance rather than an emergency response to severe deterioration. Scheduling biennial or triennial cleaning prevents heavy buildup that requires aggressive techniques risking paint damage. This proactive approach maximizes the protective benefits while minimizing risk and cost over time.
Discover Expert Pressure Washing Services in South East PA
While DIY pressure washing offers cost savings, professional services deliver peace of mind that your painted surfaces receive expert care calibrated precisely to their needs. Incorrect technique costs far more in repairs than professional service pricing, making expert help a wise investment for many homeowners.
Our experienced team at Berks Pressure Washing understands the nuances of different paint types, ages, and conditions. We use precisely calibrated equipment, proper pressure settings, and appropriate nozzles to clean thoroughly while protecting your investment. Every project begins with surface assessment and test washing to ensure safe, effective results. Learn about our expert process and discover how professional pressure washing enhances your home’s appearance and longevity. Ready to restore your painted surfaces safely? Contact Berks Pressure Washing today for a consultation and experience the difference that proper technique and professional equipment make in protecting your home’s exterior.
Frequently Asked Questions About Pressure Washing Painted Surfaces
What PSI is safe for washing delicate or old paint?
For aged or delicate paint, stay between 500 and 1000 PSI maximum, using a 40 degree nozzle for wider dispersion. Consider soft washing as the safer alternative, as it eliminates pressure concerns entirely while delivering equivalent cleaning through chemical action.
How often should I pressure wash my home’s painted exterior?
Most painted exteriors benefit from pressure washing every two to three years, though homes in humid climates or near trees may require annual cleaning. Visual inspection helps determine timing, schedule when you notice visible mold, dirt accumulation, or color dulling.
Can I use eco-friendly cleaning solutions with pressure washing?
Yes, biodegradable pressure washing detergents and vinegar based solutions work effectively while protecting landscaping and groundwater. Mix white vinegar with water at a 1:3 ratio for light cleaning, or choose commercial products labeled safe for plants and environmentally friendly.
Should I touch up paint after pressure washing?
Inspect surfaces after washing and drying for any lifted edges or damage requiring touch up. Small repairs with matching paint prevent moisture intrusion and extend overall paint life, address any compromised areas within a week of washing for best results.
How do I handle mold and mildew during pressure washing?
For heavy mold, apply a cleaning solution and allow 10 to 15 minutes dwell time before washing at reduced pressure. Mold requires chemical treatment rather than just mechanical removal, so soft washing often proves more effective for biological growth. Focus on killing spores, not just removing visible growth.
What should I do if paint starts peeling during washing?
Stop immediately and reduce pressure by at least 25 percent or switch to soft washing. Complete the project at lower intensity, then assess damage after drying. Small peeling areas can be spot repaired, but extensive damage may indicate the paint was already failing and needs professional evaluation.